
I am lazy!
In the summer, standing every day for an hour in the garden with my legs in the belly?
Without me!
And where to get someone as a vacation stand-in?
Difficult, very difficult.
So here comes the technology
Thus an irrigation system was needed. The irrigation system as such was quickly decided: Gardena Pipeline, with a total of four OS 140 pop-up sprinklers and an AquaContour. In addition, two Micro Drip circuits for our flowerbed and the tomatoes / balcony plants. The whole stuff is connected to three separate taps distributed around the house.
Now all that was left was to pick the right control computer(s). But somehow there was nothing that really excited me.
My desired system had to be able to do the following:
- control up to 12 valves
- be compatible with my chosen Hunter valves
- controllable via my smart home system (Domoticz)
- preferably without manufacturer cloud connection
The choice is very narrow. The closest thing would have been the Smart Water Control from Gardena, but that was way too expensive for me. With three controllers and everything pi-pa-po that would have been a few hundred euros. I don’t even want to talk about professional systems a la Hunter or Rainbird.
After a bit of thinking, I then thought to myself:
“Why don’t you just build it yourself? Can’t be that hard.”
And indeed, the whole thing is relatively easy to implement. And comparatively cheap, too.
This is how the construction looks like
In the final construction, which will be finished in spring 2021, I have the following structure:
- Water tap:
– Central valve directly at the tap
– Valve box with two valves, for lawn and flowerbed/hedge - Water tap:
– Central valve directly at the tap
– Valve box with three valves, for lawn, vegetable bed and patio plants - Water tap:
– Central valve directly on the tap
– Valve box with three valves, for lawn, flower bed and water socket
The central valves are used so that I can completely shut off each strand of a faucet directly. These valves are always closed by default and only open when one of the valves in the respective circuit opens. This is quite handy, for example, if someone rumbles against the connection at the supply socket (which connects the faucet to the pipeline in front of the valve boxes), such as when mowing the lawn. Without such a valve, the water would run out en masse and splash around. Not that anything like that has ever happened to me… no no no, never… 😉
The control electronics
I decided to use a system that consists of the following components:
- NodeMCU V2 ( = complete ESP 8266 developer board)
- MCP 23017 multiplexer
- 3 x 4 relay
- 230VAC (110VAC in US) to 24VAC transformer
- Software: ESP Easy
- Valves: Hunter PGV 101-GB
- Valve boxes: Gardena V3 and No-Name
A quite complete parts list can be found in the attachment.
I used the multiplexer because otherwise I would have run out of GPIO pins from the ESP8266. If you have to control e.g. only four valves, you can leave the multiplexer aside and connect the relays directly to the ESP.
The circuit diagram for the simple solution without multiplexer looks like this:

And here the schematic with multiplexer:
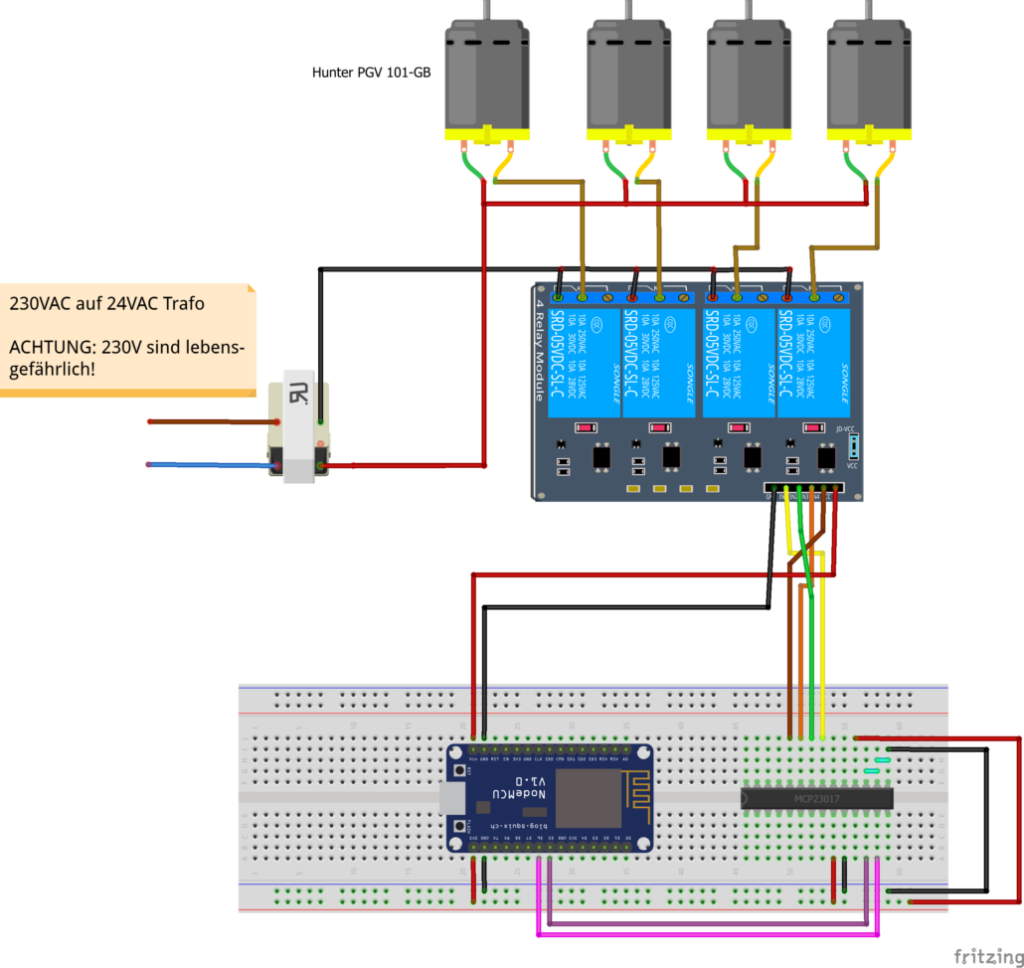
Attention: Danger to life!
You only have to be careful with the 110V (or 230V in europe) supply line to the 24V transformer. Who does not have the confidence to connect something like that himself:
STAY AWAY!
110V/230V is not to be trifled with, it’s life-threatening. I do not take any responsibility if someone of you gets a wipe and may look at your own vegetables from six feet under.
Fortunately, this concerns only this one supply line, which can be insulated quite easily. The rest is 24V for the valves and 3.3V or 5V for the control electronics, both completely harmless.
So solder the whole thing together according to the schematic and put it into a suitable housing. In my case, this is a simple surface-mounted small distributor with a din rail, on which the transformer is clamped. Two wires go into this case: the power cable for the transformer, where I connected the Earth to the DIN rail, and the USB power supply for the ESP. You can use any cell phone power supply. But I also installed only two of the three 4-fold relay blocks. It’s quite possible that the case will be too small when I finish everything next spring. You should place the housing somewhere in your house at a suitable place, so that
- the ESP gets a connection to your WIFI
- you have power, i.e. two sockets for USB power supply and transformer connection
- the control lines to the valves are easy to install, i.e. without too many holes in the walls of your house.
I use A-2Y(L)2Y ground cables, 4x2x0.8, which are especially suitable for laying into the ground. To make the whole thing a bit easier to maintain and remove, the control cables are not screwed directly to the relays. I have connected plug-in luster terminals to the outside of the small distributor by means of short supply lines. This way, I can easily disconnect the control cables and bring the control electronics to the workshop without having to screw around a lot. And the lines do not get mixed up.
The whole thing currently looks like this:

You can see the board with NodeMCU and MCP 23017 on the left side, the transformer in the middle and two of the relay boards on the right side. Via the Wago terminals the two 24V lines (are no poles, because they are AC) are distributed to the relays and to the outside. Through the left hole at the bottom the 110V/230V NYM-J 3×1.5 supply line goes in, through the two other holes the control lines come out and go to the luster terminals. At the moment only two of the three taps are controlled, tap 2 will be connected to the system in spring 2021. That’s why there are only two relay blocks of 4.
The software
The software is ESP Easy. I already know this from another project I built. Under ESP Easy you can find the project page with instructions for the whole thing. There is also an explanation how to control the pins of the NodeMCU or the multiplexer via Domoticz. For systems like OpenHAB, FHEM or NodeRed the whole thing should work very similar. In short summary:
- Install ESP Easy according to the documentation on the NodeMCU and bring it into the own WLAN.
- Under “Hardware” at “I2C Interface” SDA with GPIO-12 (D6) and SCL with GPIO-14 (D5)

- Under “Devices” create a new device named “Switch Input – MCP 23017” and configure it as follows:
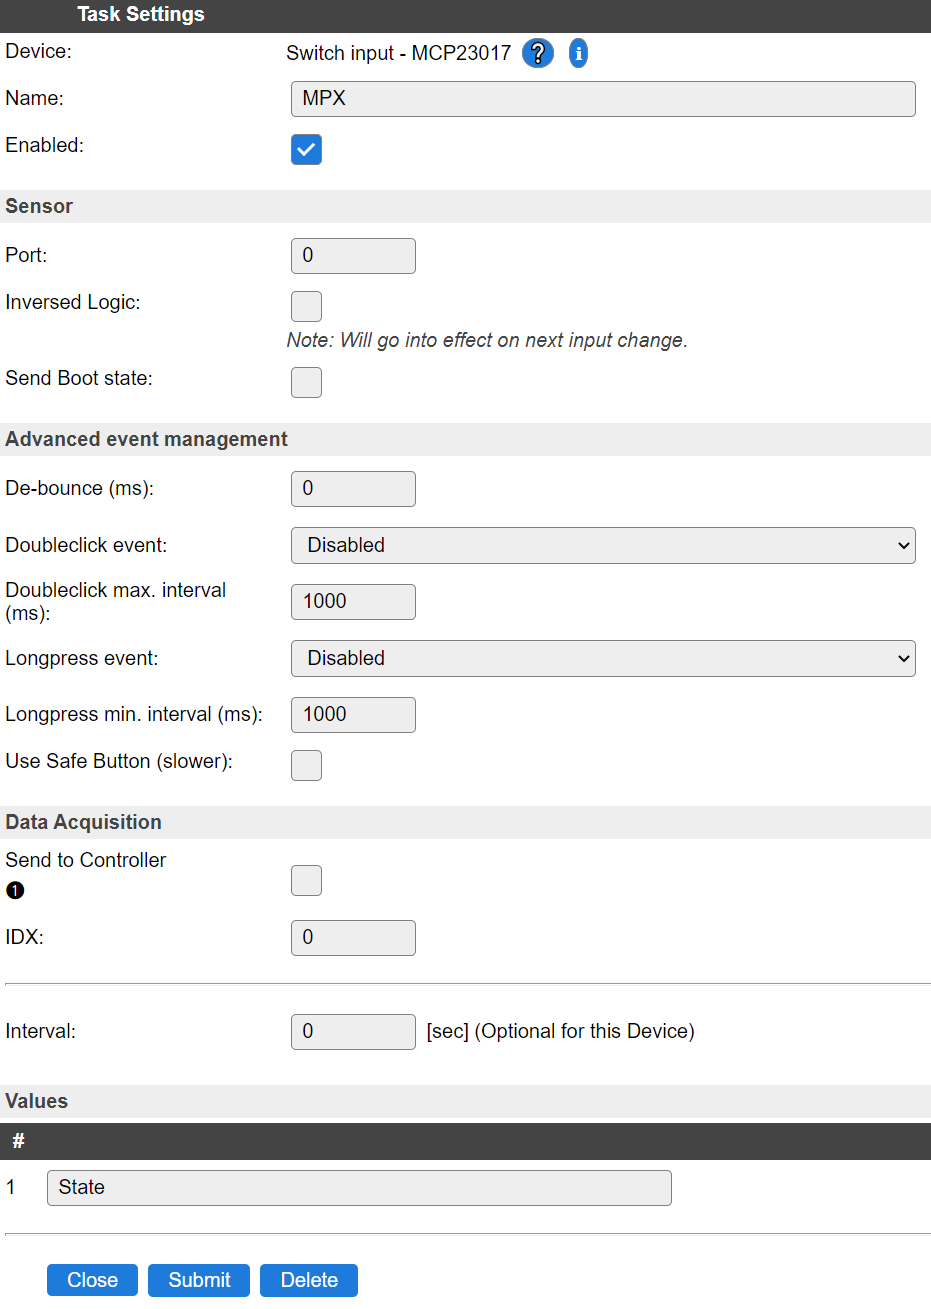
That’s it. With the command
http://ip.of_your.esp.easy/control?cmd=mcpgpio,1,0
you can now e.g. switch on the first relay (and thus the valve attached to it) and with
http://ip.of_your.esp.easy/control?cmd=mcpgpio,1,1
you can close it again. Totally easy.
Using Domoticz, which runs on my Linux server anyway, I can control the irrigation very flexibly. From simple on/off, to schedules, to weather-dependent control, everything is possible with it. And via VPN I can intervene in the system from anywhere in the world or check if everything is running.
Another advantage is, of course, that this system is not dependent on any manufacturer’s cloud. Thanks to Domoticz, however, I can still control the irrigation via Alexa if I want to.
“Alexa, turn on the flower bed” – also very fine.
The parts list
Here is the parts list. I often ordered more parts than necessary – you never know what you will come up with ? Especially the electronic parts are pretty cheap that way, even without having to order them from China.
Electronics:
- 3x NodeMCU Lua Amica V2 *
- 3x MCP23017 Port Expander *
- 5x 4-relay module 5V *
- Surface mounted small distributor *
- Jameco Reliapro MGT2450P 110V to 24VAC Transformer *
- Hunter PGV 101 GB 1″ Ball Valve *
- 50 meters of A-2Y(L)2Y ground cable 4x2x0.8mm *
- 3 strip grid printed circuit board *
- Jumperwire cable, 3x 40 pieces *
- Electronics-Salon DIN Rail Mount Pluggable 12×2 Position *
- Wago 221-413, Connecting terminal, 3-pole *
- Wago 221-415, connection terminal, 5-pole *
Irrigation (exemplary selection):
- Gardena valve box 1255-29 *
- Gardena AquaContour pop-up sprinkler *
- Gardena OS 140 Pop-up Irrigation *
- Gardena Micro Drip Starter Set M *
The links marked with an asterisk (*) are so-called affiliate links. If you click on such an affiliate link and buy through this link, I get a commission from the respective online store or provider. The price does not change for you. As an Amazon affiliate I earn on qualified sales.
Shopping tip at the end
Another tip for the shopping of irrigation elements such as sprinklers, pipes, etc.: if you have planned your own needs exactly, which I would definitely advise, and are not in a hurry with the installation, then it is worth waiting for various offers especially for the Gardena parts. Somewhere there’s all the stuff always on offer. And what is also a great source are the outlet or B-Ware stores of all those online shops. I have bought virtually all my OS 140 and the AquaContour as B-ware, partly for 30% of the original price. The only drawback was always only the torn boxes and 1-2 scratches, but they have no effect on the function. Nevertheless, there is the warranty and guarantee in full.
At this point I have to send out a shout out to one of the best Facebook groups the world has ever seen (unfortunalty only in german):
Uncle Phil’s Workshop
The members there have been very helpful to me with one question or another about this project.
I hope I could inspire you a little bit. If you have any questions, feel free to contact me on any of the many platforms I’m on.
Be First to Comment